Register Log In

  • Home
  • About
  • Recipes
    • Beef
    • Breads
    • Breakfast
    • Burgers
    • Candy bars
    • Chicken
    • Chocolate
    • Desserts
    • Dinner
    • Fish
    • Lamb
    • Meal under 30 minutes
    • Pork
    • Salads
    • Sauces and Dips
    • Soups
    • Vegetables
    • Vegetarian
  • Shop
  • Ingredients FYI
    • Food chemistry: How to make a great beef stew
    • What are the most popular pizza toppings?
    • What is Jicama?
  • How-to videos
    • Salsa Verde
    • 5-minute fried cauli rice
    • BBQ sauce
    • Marinara sauce
    • Jicama french fries
  • IMAGE
  • VIDEO

Gimbap, Kimbap (keto, gluten free, sugar free)

Servings: 8


INGREDIENTS

  • Cauli rice
  • 700 g (7 cups) roasted cauliflower – coarsely riced
  • 80 g (1/3 cup) cream cheese – softened
  • 30 g (2 tbsp) tamari
  • 27 g (2 tbsp) sesame oil (can add up to 1 tbsp more to enhance the taste if desired)
  • 4 g (1 tsp) monk fruit sweetener (or sweetener of your choice)
  • 20 g (2 tbsp) sesame seeds – unsalted and mildly dry roasted to light golden
  • Gimbap with filling
  • 7 sheets nori (seaweed wraps)
  • 100 g (2 carrots) long carrot – julienned (optional - removing reduces total carbohydrate)
  • 25 g (2 tbsp) coconut oil , 1 for carrots and 1 for egg omelet
  • 112 g (16 g X 7 pieces) Pickled Yellow Radish (sugar free Japanese or Korean)
  • 4 large eggs – beaten
  • Customizable ingredients
  • 145 g (1 cup cooked) spinach – long leaves cooked or 1 English cucumber – cut into long thin strips
  • 325 g (11 to 12 oz) smoked wild salmon (used in this version, see macros with and without) or raw sushi salmon

DIRECTIONS

  • Step 1: Preparing the cauli rice: Preheat your oven to 190 C / 380 F
  • 1.   Place your cauli rice onto a large cookie sheet, spread evenly and as thinly as possible. No oil or grease required

  • 2.   Place into your oven on middle shelf and bake for about 15 minutes – toss and bake for another 5 – 10 minutes or until the cauli rice is no longer raw, is al dente but not browned

  • 3.   Remove from oven and immediately scoop into a bowl to stop further baking. Let completely cool to room temperature before adding more ingredients

  • 4.   Add in all the rest of the cauli rice prep ingredients, and with your hands blend all the ingredients and set aside

  • Step 2: Preparing the filling
  • 5.   In a small frying pan, melt 1 tablespoon of coconut oil and when heated sauté your Julienne carrots for about 1 minute. You want them al dente (firm). Remove and set aside

  • 6.   Add the second tablespoon of coconut oil to the same frying pan and when oil is very hot take the beaten eggs and pour into pan and make an omelet. When just lightly golden on the bottom and firm on top, roll it up. Cool the omelet completely and then cut into lengthwise trips. Set aside

  • 7.   Get your long strips of the yellow pickled radish, depending on how thick the radishes, you may want 2 long strips per roll (in that case prepare 12 – 14 strips). Set aside

  • 8.   Next choose whether you want the spinach (traditional version) or cucumber (modern variation). If spinach, parboil whole long leaves for 1 minute. Remove from water and place into ice water, remove and drain well. Squeeze out the water very well, or it will make your rolls too soggy. If using a cucumber, cut along the length that is about the same length as the nori sheet is wide. Then cut each cucumber into sections

  • Step 3: Assembling your nori roll
  • 9.   Take your bamboo sushi mat and place it inside a zip lock bag and zip the bag. This will save you a lot of clean-up hassle

  • 10.   Place one nori sheet, shiny side down and rough side up, onto the mat. Scoop out 1/2 cup of your prepared cauli rice, spread from the side closest to you to about 5 cm or 2 inches from the top edge. Make sure you spread it evenly and to each edge of the nori sheet

  • 11.   At the closer edge to you, place the egg omelet strips

  • 12.   Lay a row of the sautéd carrots. Spread evenly

  • 13.   Add the yellow radish, and cucumber or spinach

  • 14.   Next add a row of either the smoked salmon or raw sushi grade salmon spread evenly

  • Step 4: Rolling and cutting
  • 15.   To make the roll, curl your fingers just underneath the edge of the bamboo mat as you turn it over. Then, use your fingers to close it and compress the contents. Finally, roll the mat all the way over and compress again to close the roll. Stop at the edge of the cauli rice

  • 16.   Dampen the final 5 cm or 2 inch strip of nori with water and finish the roll to seal

  • 17.   Leave the sushi roll resting on its seam. This will allow the moisture of the rice to sink into the seam of the sheet – thus helping it to seal

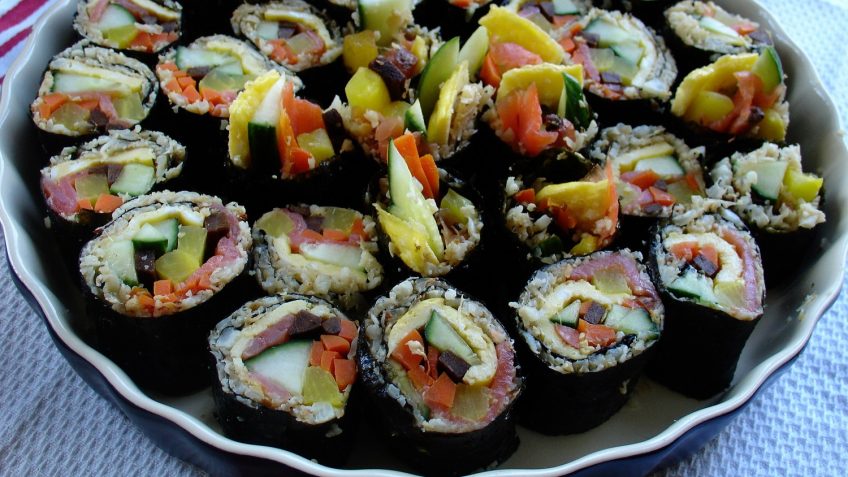
  • 18.   Repeat the assembly and rolling until you have made all 7 gimbap rolls

  • 19.   To cut into 8 individual bite-sized pieces, use a very sharp knife

MACRONUTRIENTS CHART

Macros

FYI

If you are serving at a later time, place a sheet of cling wrap lightly over the top of the cut gimbap and refrigerate until needed.

With the gimbap platter I serve wasabi mayonnaise as a dipping sauce and also offer a plate of pickled ginger alongside as well.

A word of advice, always read the label and make sure you are purchasing the no sugar added pickled ginger and wasabi powder or paste. As we know, everything has added sugar, and that is a “no-no” in the keto world.


Recipe tags: banting, cauli rice Gimbap, cauli rice Kimbap, diabetic, diabetic Gimbap, diabetic Kimbap, gluten free, gluten free Gimbap, gluten free Kimbap, keto, keto Gimbap, keto Kimbap, keto Korean Gimbap, keto Korean Kimbap, ketogenic, ketogenic Gimbap, ketogenic Kimbap, ketogenic Korean Gimbap, ketogenic Korean Kimbap, LCHF, LCHF Gimbap, LCHF Kimbap, low carb, low carb Gimbap, low carb Kimbap, sugar free, sugar free Gimbap, sugar free Kimbap
Leave Comment

or cancel reply

You may use these HTML tags and attributes: <a href="" title=""> <abbr title=""> <acronym title=""> <b> <blockquote cite=""> <cite> <code> <del datetime=""> <em> <i> <q cite=""> <s> <strike> <strong>

  • author By Angela Wilkes
  • GET YOUR FREE INTERACTIVE
    E-COOKBOOK

    • Already have an account? Sign In »
    • Lost your password?
  • Cuisine: Korean
  • Category: Meal under 30 minutes
  • Created: September 12, 2017

Translate Traducir
Oversætte übersetzen
번역 vertalen
翻訳する

Similar Recipes
  • Broccoli and Feta Casserole
  • Keto Spring Roll in a Bowl with Shrimp and Pork
  • Tex-Mex Chicken Stuffed Zucchini Boats
Archives
  • March 2019
  • October 2018
  • November 2017
  • May 2017

All rights reserved © Angela Wilkes 2017-2022 Privacy Policy

Translate »