1. Preheat the oven to 400 F or 200 C. Place a rack in the middle position of the oven
2. After cutting the butternut squash in half and peeling the outer skin to the orange layer of flesh, place onto a baking sheet, brush with the olive oil and sprinkle the salt and pepper on top. Bake for approximately 10 – 15 minutes or until you can insert a knife easily to about 1/2 inch or 1 cm into the flesh
3. In the meanwhile, heat a dry skillet over medium low heat and when skillet is hot add the raw pumpkin seeds. Dry roast the pumpkin seeds until they begin to get lightly golden and become fragrant. Remove from heat and place into a cool dish. Set aside
4. Make the glaze by combining the unsalted butter, olive oil, sage powder, and grated nutmeg in a small bowl. Set aside
5. Remove baking tray from oven, and carefully transfer one half of the butternut squash from your roasting dish onto a cutting board. Place a painting stir stick or chop stick one on either side of your squash to prevent cutting all the way through. With a sharp knife begin to cut thin slits down the back of the squash. Make the cuts as even thickness as possible
6. Return the butternut squash back onto the baking tray and brush the glaze over the now sliced backs of the squash
7. Return to the oven. Bake for 10 minutes, then use drippings to brush over the top of the squash a second time. Roast for an additional 20 or more minutes until tender. Baking time will depend on the size of your squash and how soft you like it done
8. Remove from the oven, again baste with any drippings from the bottom of the baking tray and sprinkle the roasted pumpkin seeds on top of the squash
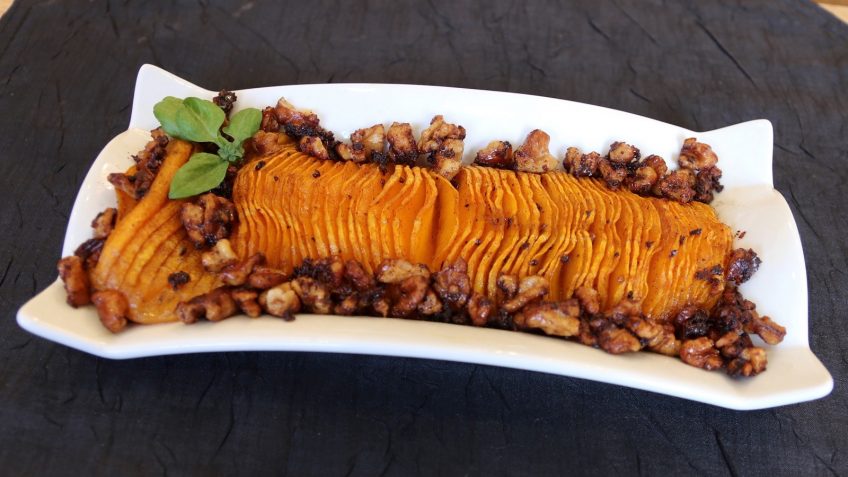
9. Preheat the oven to 400 F or 200 C. Place a rack in the middle position of the oven
10. After cutting the butternut squash in half and peeling the outer skin to the orange layer of flesh, place onto a baking sheet, brush with the olive oil, and sprinkle the salt and pepper on top. Bake for approximately 15 – 20 minutes or until you can insert a knife easily to about 1/2 inch or 1 cm into the flesh
11. In the meanwhile, make the caramelized walnuts. In a small saucepan add the olive oil, butter, and sweetener. Cook over medium low heat until sweetener begins to caramelize; do not stir. When sweetener is golden, add the cinnamon, nutmeg and maple extract, stir and cook for about 1 minute
12. Remove about half of the caramel sauce and set aside. Add the chopped walnuts to the pan with the rest of the caramel butter, roast for 15 to 20 minutes until walnuts are caramelized. Turn off the heat and let cool. Set aside
13. Remove baking tray from oven, and carefully transfer one half of the butternut squash from your roasting dish onto a cutting board. Place a painting stick or chop stick on each side of your squash to prevent cutting all the way through. With a sharp knife, begin to cut slits down the back of the squash, in thin slices. Make the sections as even thickness as possible
14. Return the butternut squash back onto the roasting dish and brush the reserved caramel butter over the now-sliced backs of the squash
15. Return to the oven and roast for an additional 20 to 30 or more minutes until tender. Baking time will depend on the size of your squash and how soft you like it done
16. Remove from the oven, baste with any drippings, and sprinkle the caramelized walnuts around the perimeter of the squash

 By Angela Wilkes
All rights reserved © Angela Wilkes 2017-2022 Privacy Policy